Schizo Crackme Writeup: A Reverse Engineering Deep Dive
By 0xh4ty - 2026-02-26 - 11 min read

Introduction
Over the past six weeks, I focused on understanding how Linux binaries work and how to reverse them with minimal theory and tooling, primarily through hands on practice. I started by building fundamentals in x86-64 assembly, ELF internals, and basic usage of Ghidra and GDB to bootstrap my reverse engineering workflow.
After solving two easy rated crackmes that already had public writeups, I deliberately increased the difficulty and chose a medium rated challenge with no existing solutions. This post documents the complete reverse engineering process for that challenge, the Schizo crackme, and serves as the first public writeup of its solution.
Overview
This challenge required navigating a C++ PIE binary, tracking data flow by reading from raw memory, handling subtle validation semantics, bypassing anti debugger checks, patching instructions, and combining static analysis with dynamic debugging. The theme revolves around HTTP interaction, paranoia, and unemployment, with a final success message hinting at an encoded URL.
Initial Behavior and Recon
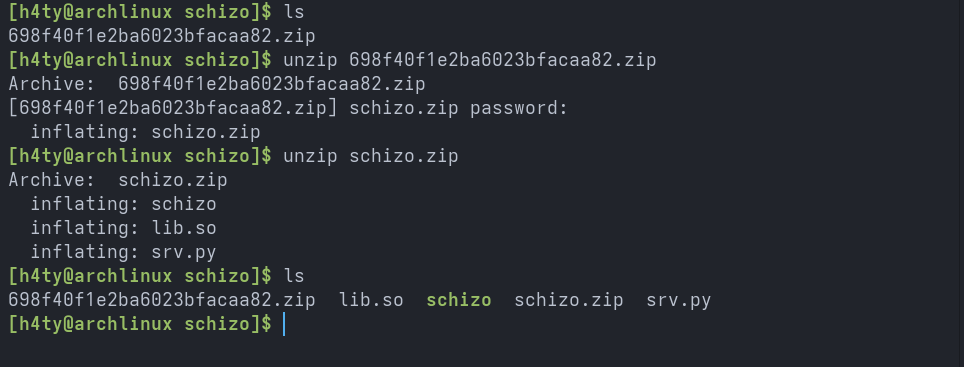
When extracting the downloaded archive, we end up with three interesting files: schizo, lib.so, and srv.py.
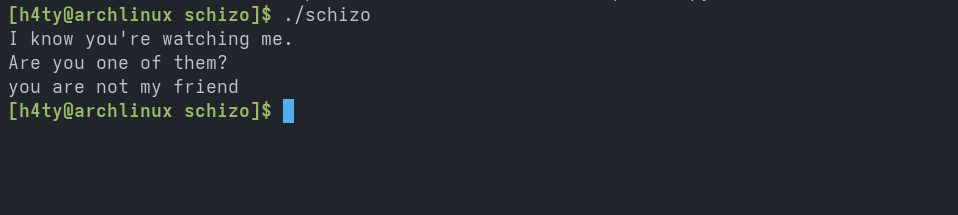
Running the binary prints the below message and then exits.
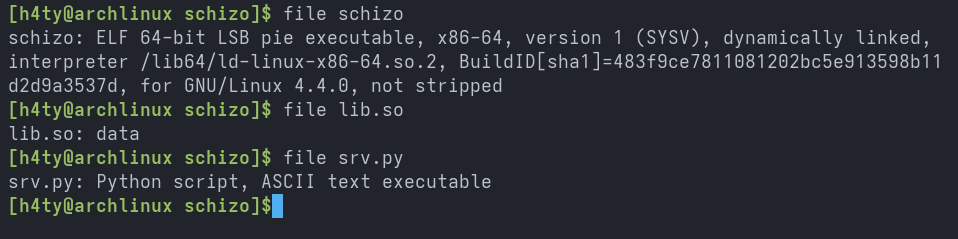
At this point, things get interesting, as the file command does not recognize lib.so as an ELF binary.
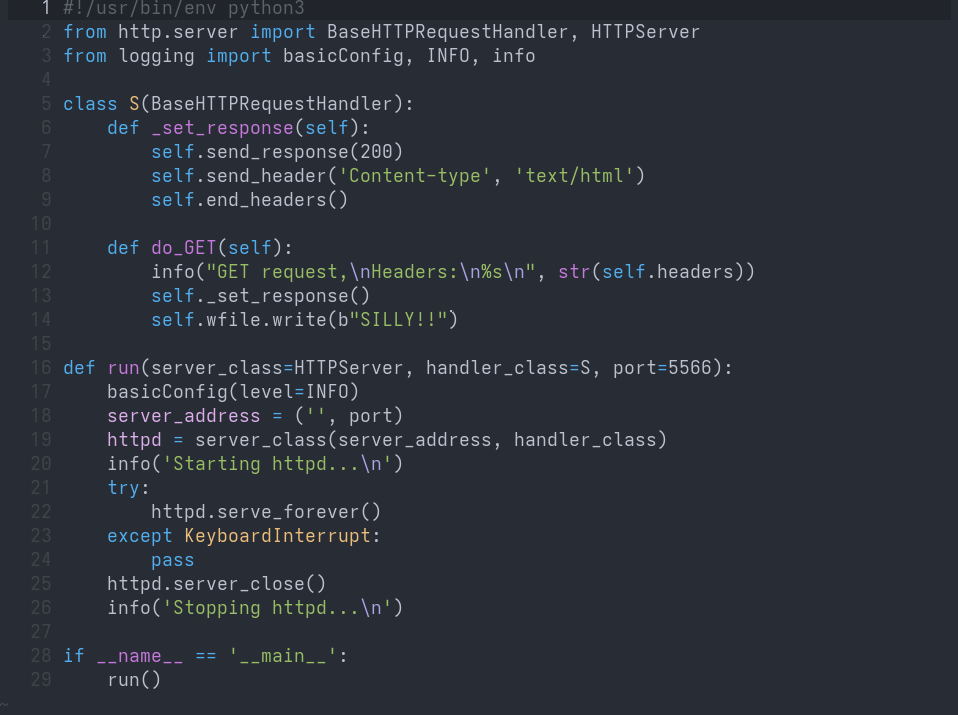
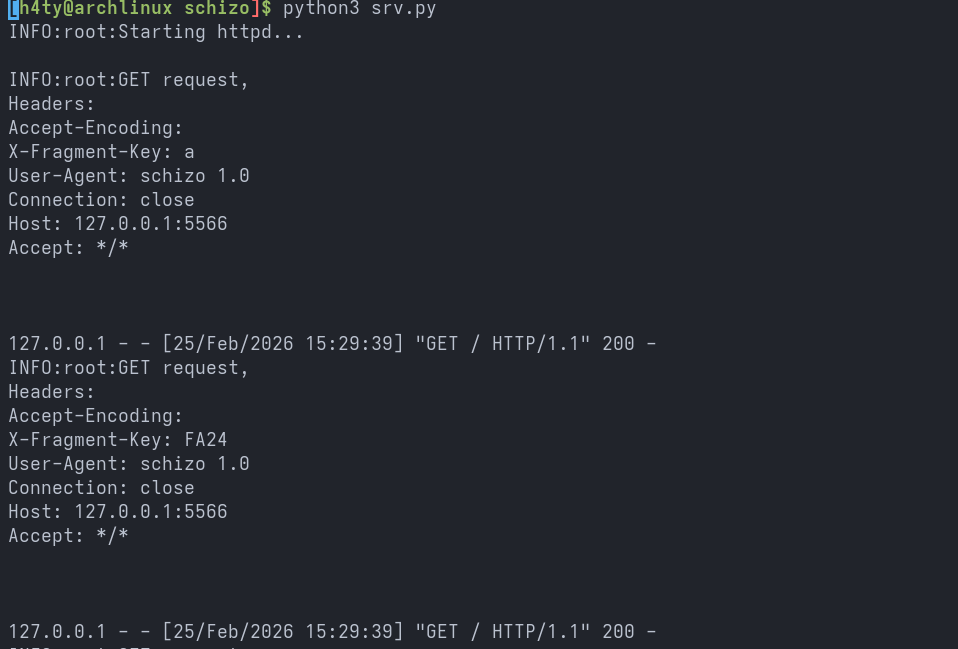
The Python script starts an HTTP server and responds with b"SILLY" for every request it receives, indicating that the binary expects the script to be running simultaneously and that two way communication is taking place.
Running the binary while the Python script is active prints HTTP request logs containing five different X-Fragment-Keys, always appearing in the same order.
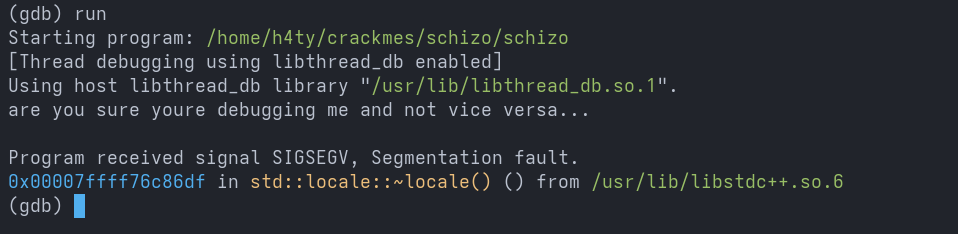
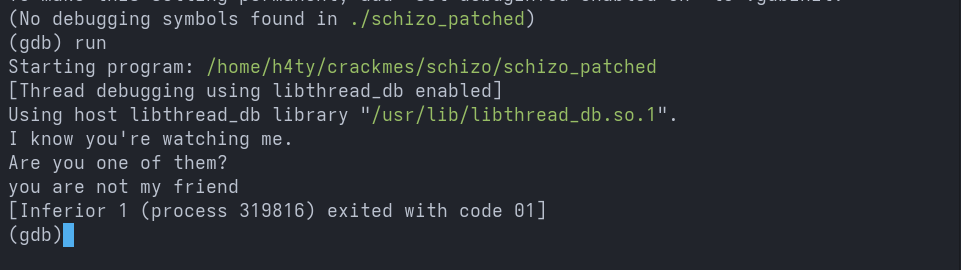
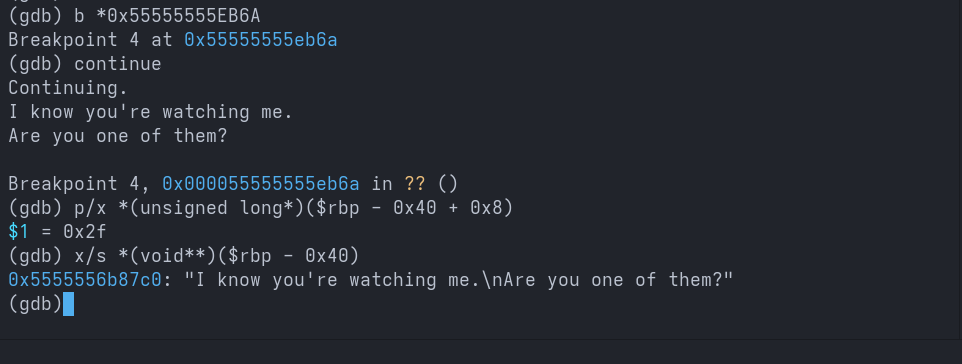
Running the binary under GDB produces a taunting message and then crashes with a segmentation fault.
Bypassing the Anti-debugger
Let us open Ghidra and try to pinpoint the exact location where the anti debugger check occurs. Ghidra lands us in the entry function of the binary. As we know, the first parameter passed to __libc_start_main must be the main function, so we rename it to main.
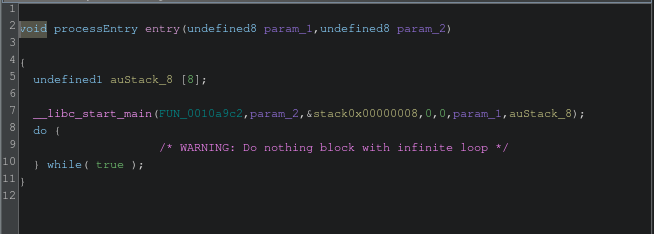
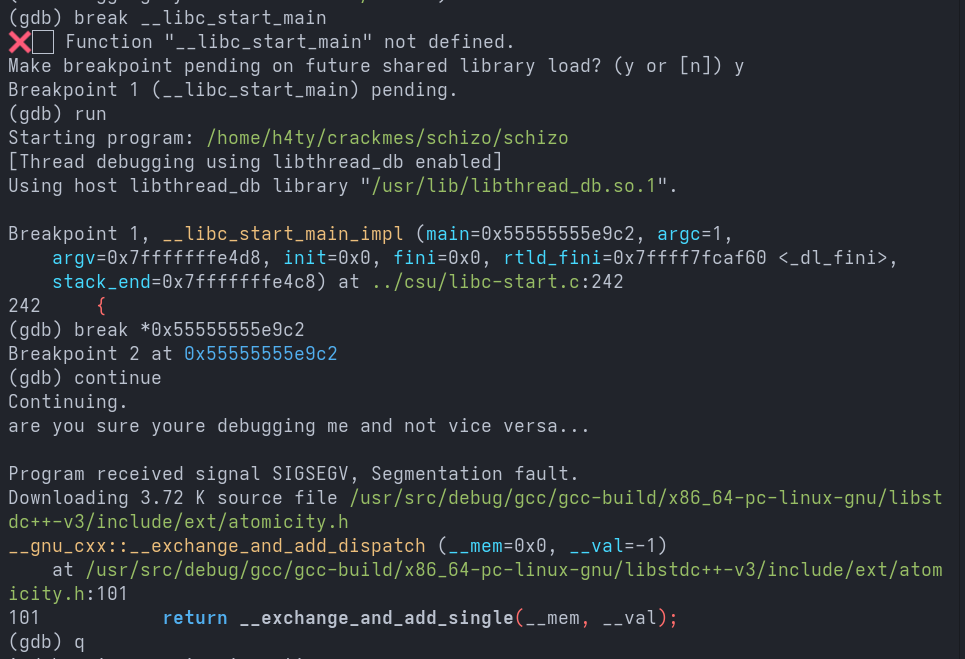
In gdb, I placed a breakpoint at main and continued execution. As you can see, the program crashed before even entering the main function. This narrows our scope to .init_array constructors.
There are only two functions present in the .init_array section.
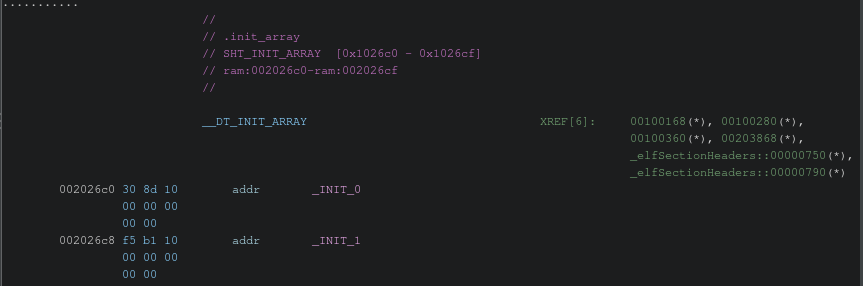
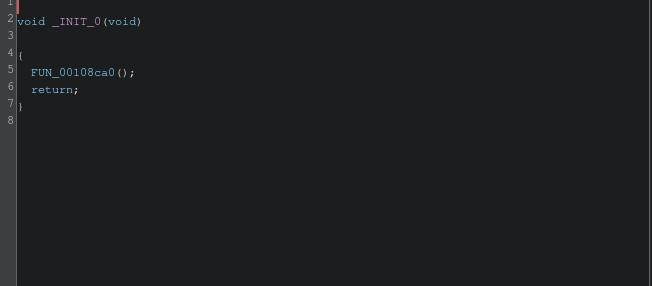
_INIT_0 and the function it calls both return nothing, so we do not need to worry about them.
This further narrows the scope, meaning the anti debugger logic must reside inside _INIT_1.
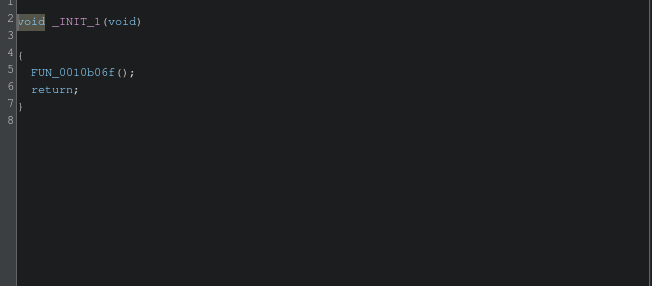
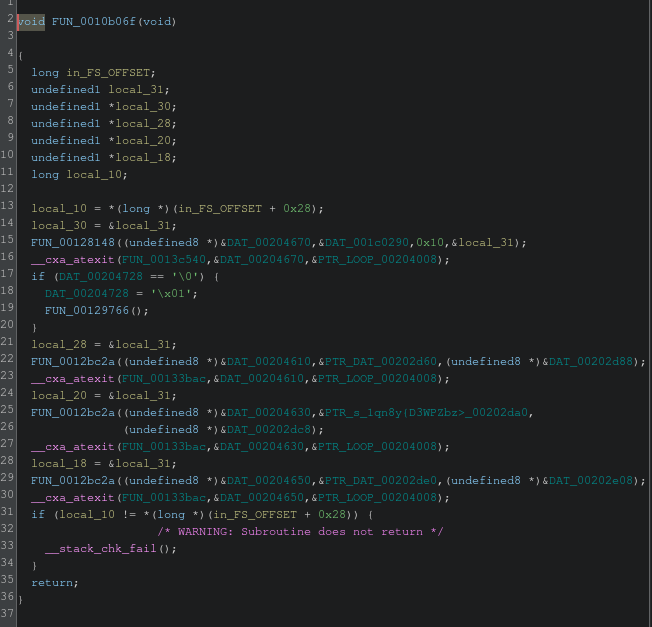
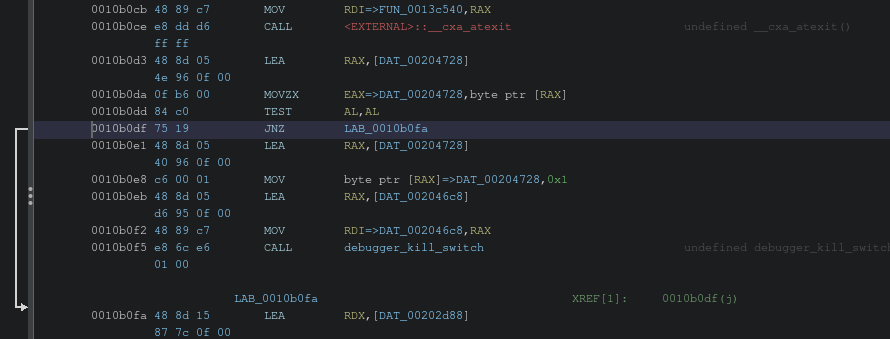
In FUN_0010b06f at line 17, we see an if condition that checks whether a memory address in the .data section holds the boolean value false, then sets it to true and calls the function inside the conditional block.
Let us inspect FUN_00129766 next.
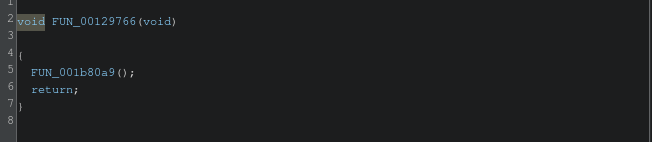
Let us inspect FUN_001b80a9 next.
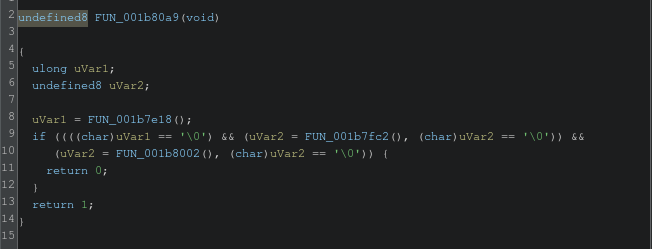
Following the function calls, we can see FUN_001b80a9 calling another function and checking whether the returned value is 0. Let us open FUN_001b7e18 and inspect it next.
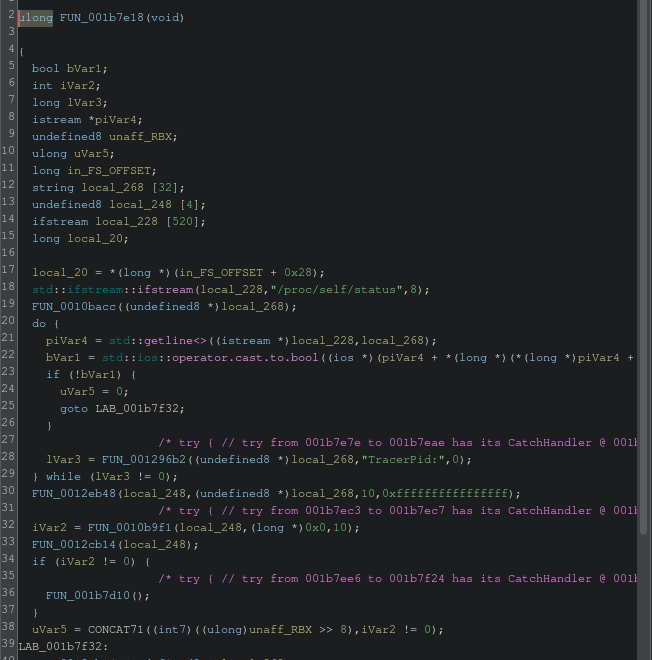
Oh yeah! we have found the logic that scans the environment in which the program is being executed. We can now confidently say that this is the anti debugger logic. Let us go back to FUN_0010b06f and rename FUN_00129766 to debugger_kill_switch.
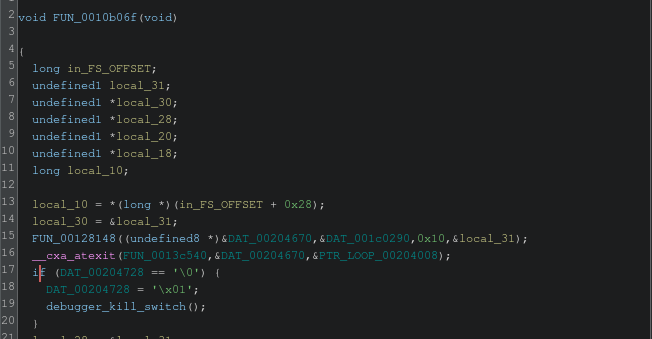
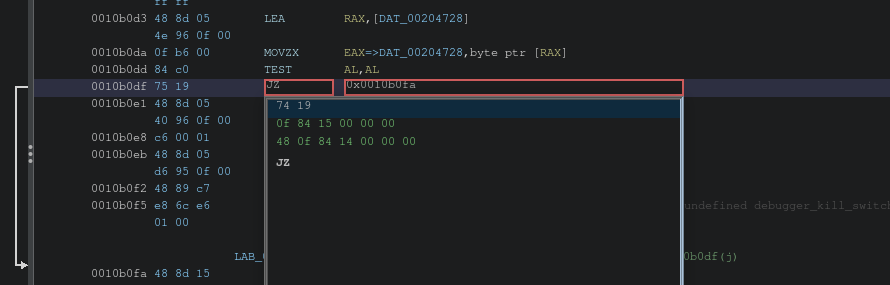
Here, we need to skip the statements inside the if branch to bypass the kill switch.
And just like that, we flip the instruction from JNZ to JZ and export the patched binary.
Hell yeah! now we can confirm that our patch worked as expected. With the debugger working, let us dive into the actual challenge.
Extracting and Analyzing the Embedded Shared Object
In main, the first thing that grabs our attention is the use of the string lib.so as a parameter to FUN_0011361c. This must be the point where the lib.so file provided in the challenge is used. By going through the functions one by one, we can easily understand what is happening here.
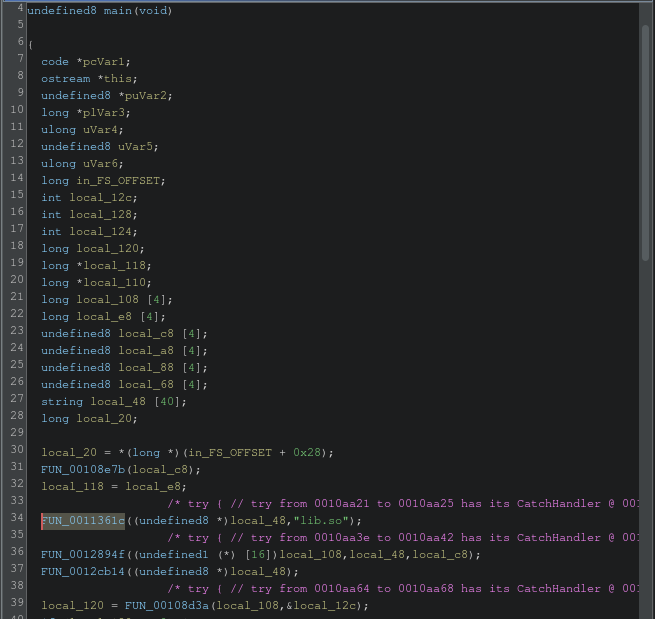
FUN_0012894f decrypts the lib.so file.
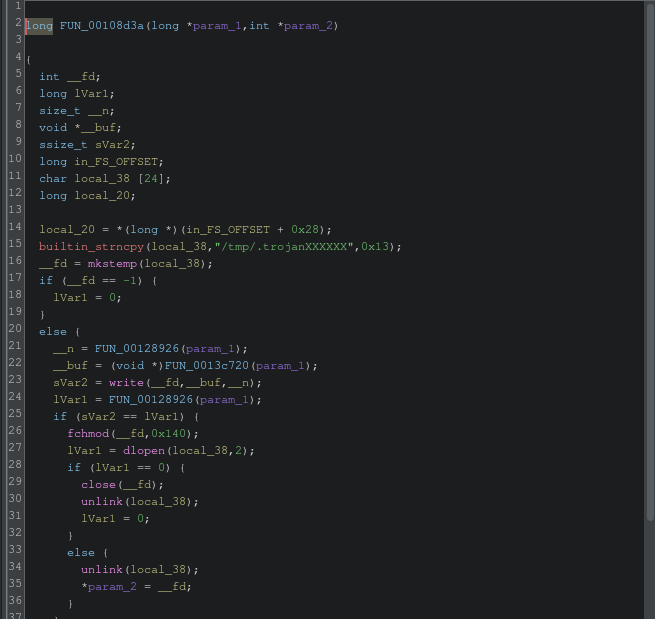
FUN_00108d3a copies the decrypted data into the /tmp/.trojanXXXXXX file after replacing the XXXXXX with random characters using mkstemp, returns a file descriptor, and then deletes the created temporary file using unlink after obtaining the file descriptor.
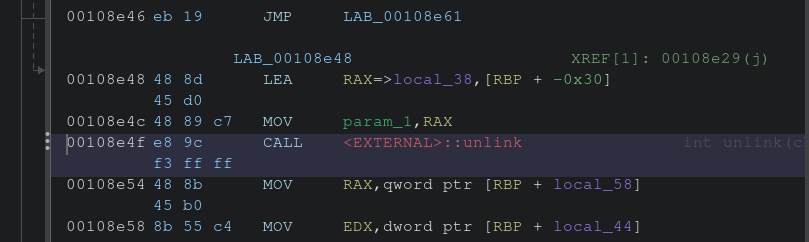
So, to extract the decrypted binary, we can use GDB to break before the call to unlink and copy /tmp/.trojanXXXXXX from disk.
The call to unlink that we need is at offset 00108e4f in Ghidra, and Ghidra adds an extra 00100000 offset for this binary. Next, we will obtain the dynamic start address of the binary using GDB.
Running the command info proc mappings gives us the start address of the dynamically loaded binary.
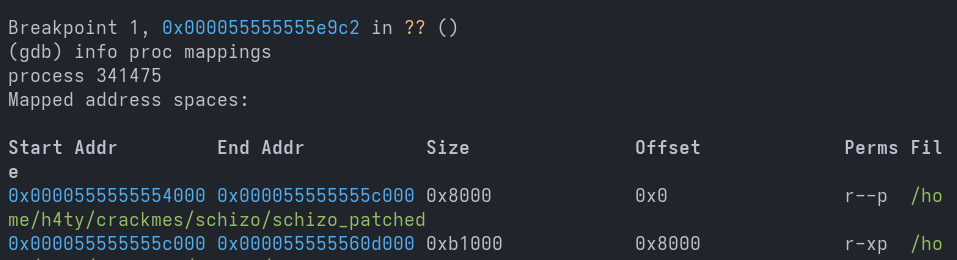
Let us use a calculator to compute the dynamic address precisely, as we will be using this method to calculate dynamic addresses going forward.
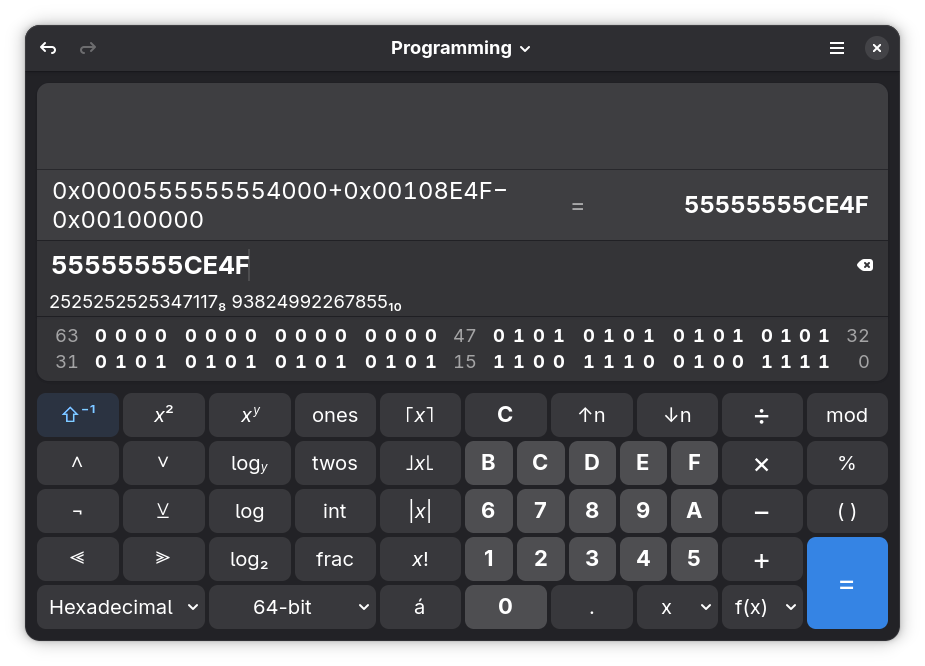
We then use the command x/s $rdi to read the data stored in RDI.

Then we copy the file to our directory for further investigation.

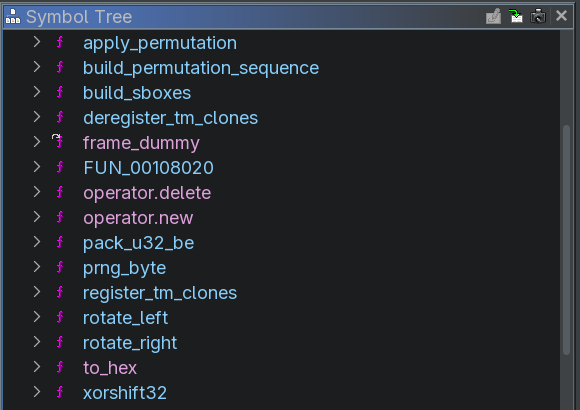
By inspecting the symbol tree itself, we can see that this code implements some form of obfuscation and deobfuscation logic.
Resolving lib.so Symbols and Identifying Control Flow
Now let us go back to main and start investigating the logic. The three dlsym calls resolve the symbols of three functions from the shared object library.
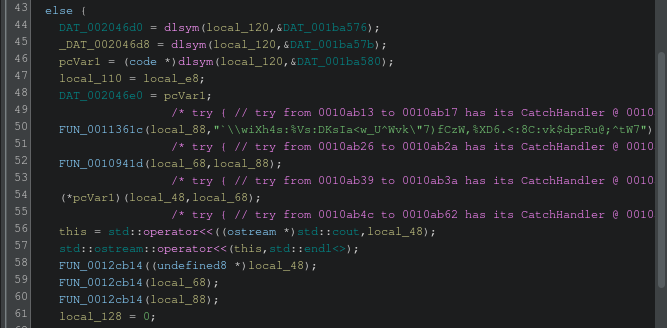
The values stored in those .data memory addresses are ___1, ___2, and ___3. Let us rename them to make it easier to identify calls into the shared object library from the schizo binary.
Looks much better now. The obfuscated string at line 50 is being transformed using ___4. Let us read its value.
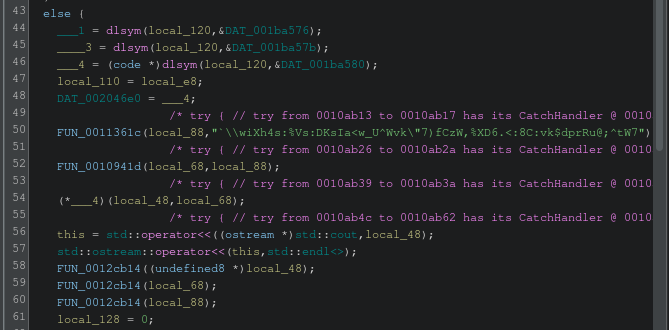
And here we go, the obfuscated string passed to ___4 has been deobfuscated and returned, and it matches the first two lines of the taunting message. We can now hypothesize that solving the challenge will produce a different third line corresponding to the success message.
Let’s go back to main and find out the success and failure paths.
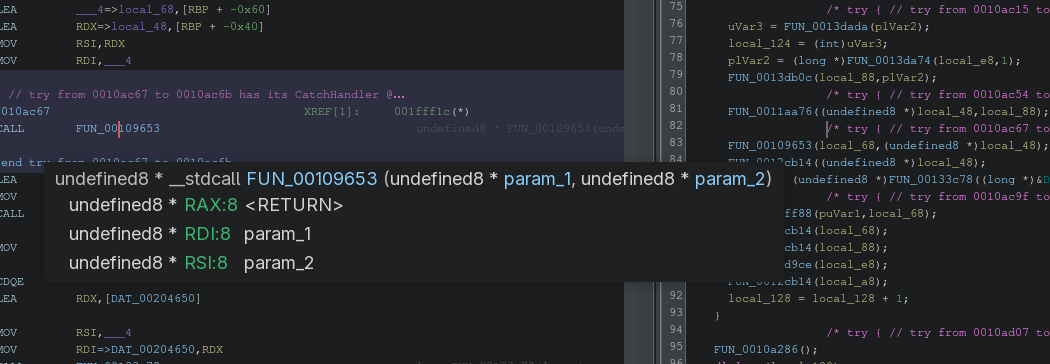
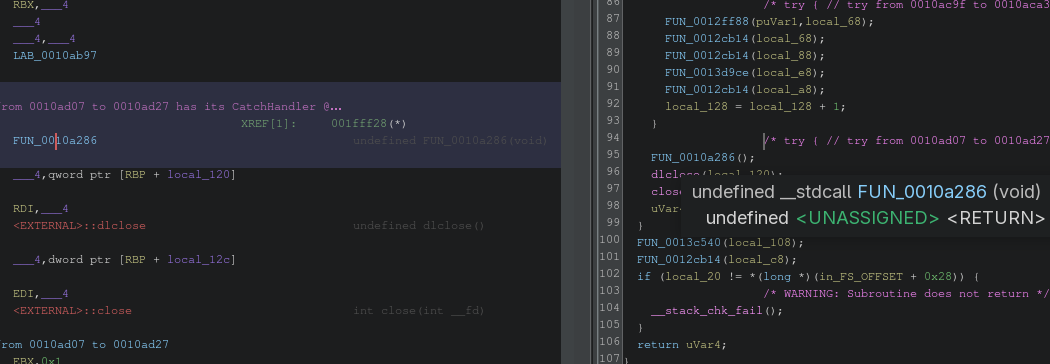
We know that the ___4 function is used for deobfuscation. Inspecting the .data offset of ___4 shows that it is referenced in three different functions. Excluding main, the remaining two functions are FUN_00109653 and FUN_0010a286, both of which use it multiple times. These are likely the success and failure paths. Let us inspect them next and determine which corresponds to success and which to failure by placing breakpoints in the middle of both functions and observing which one executes.
I was wrong with my hypothesis, as FUN_00109653 returns a value.
And FUN_0010a286 does not return anything.
Let us read the value returned by FUN_00109653.
So, FUN_00109653 returns the response sent by the Python HTTP server, which suggests that this function is responsible for building requests and propagating responses.
The Success Checker and Validation Logic
Next, let us inspect FUN_0010a286. With a single glance, we can see that this function contains both the success and failure paths, as it includes multiple control flow statements.
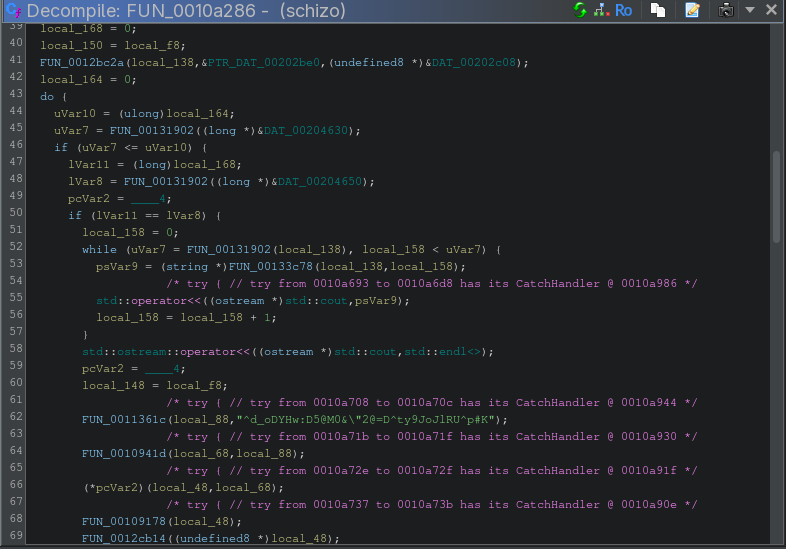
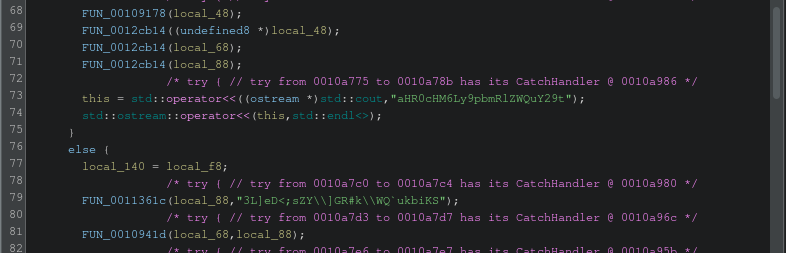
At line 73, we see an obfuscated string being printed directly, but we did not observe this when executing the binary. Hence, the success path must be this if branch and the failure path the else branch. Let us rename this function to success_checker.
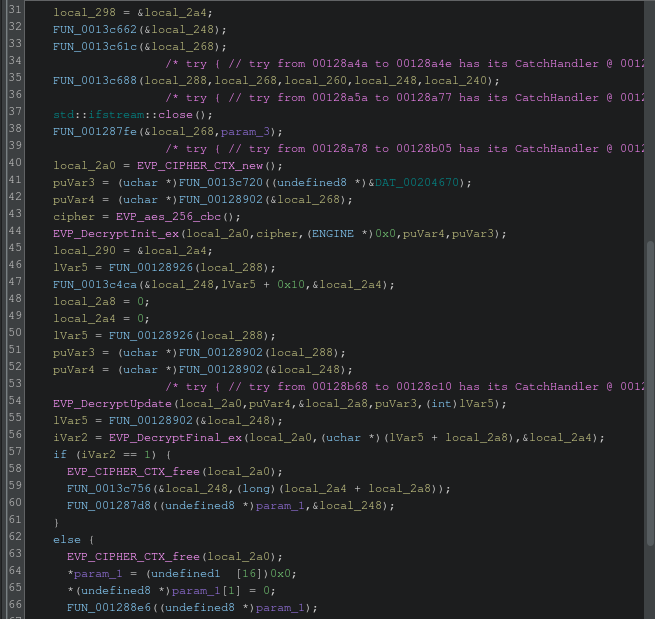
Now it gets interesting, as success_checker reads the values stored in DAT_00204630 and DAT_00204650 and performs some processing on them.
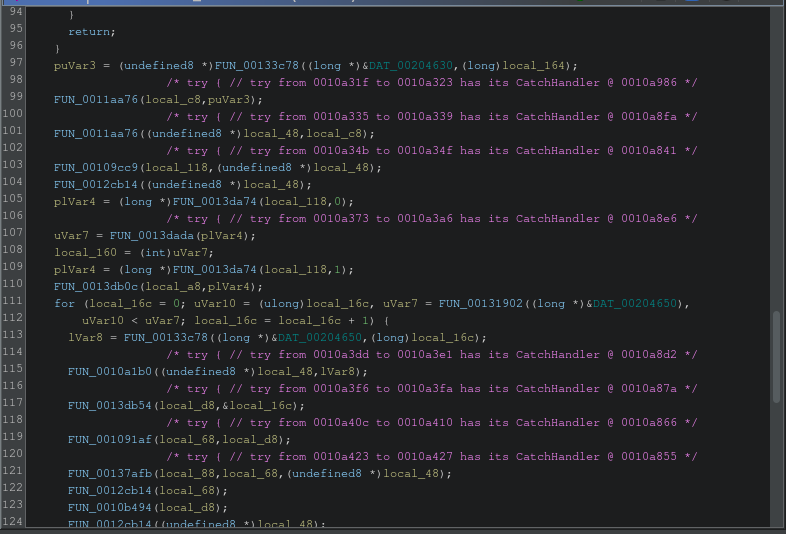
It also performs several checks and increments the value of local_168, which acts as a counter determining the success path.
Next we inspect the cross references of DAT_00204630.
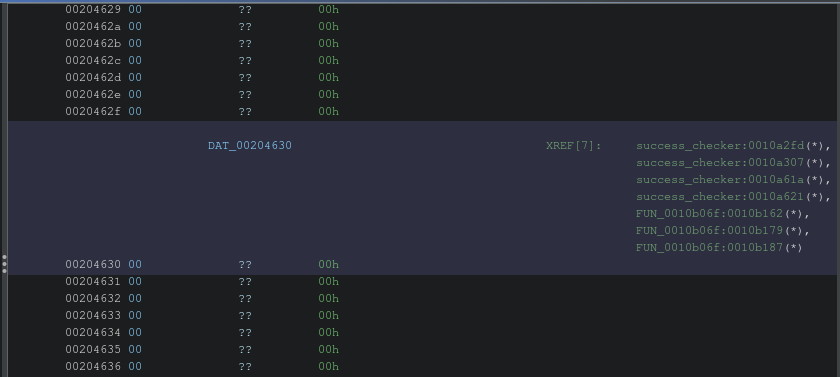
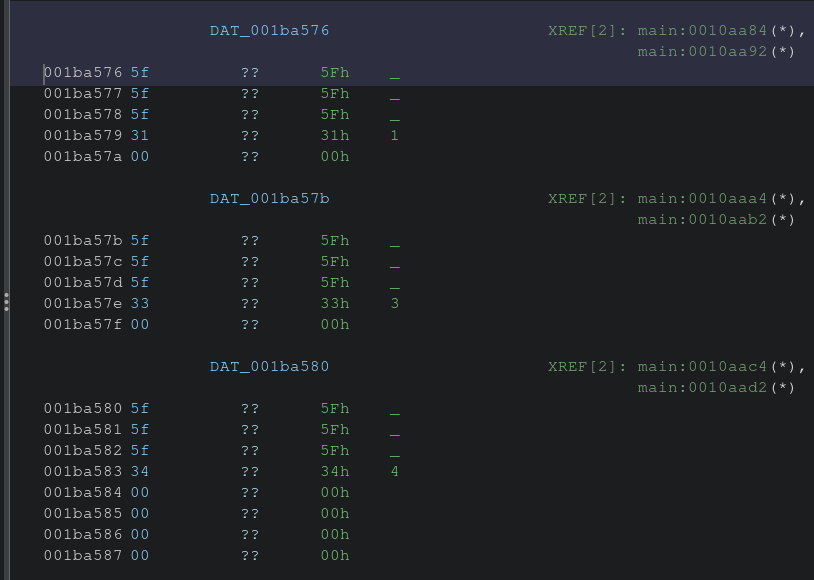
FUN_0010b06f is called by _INIT_1, and a pointer to an obfuscated string is passed in RSI to FUN_0012bc2a along with DAT_00204630.
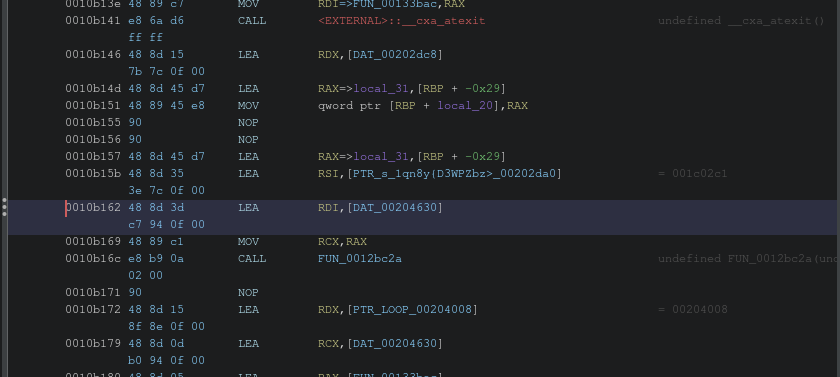
Clicking on the pointer takes us to the other string values, which indicates that these values are initialized inside DAT_00204630 before execution ever reaches main.

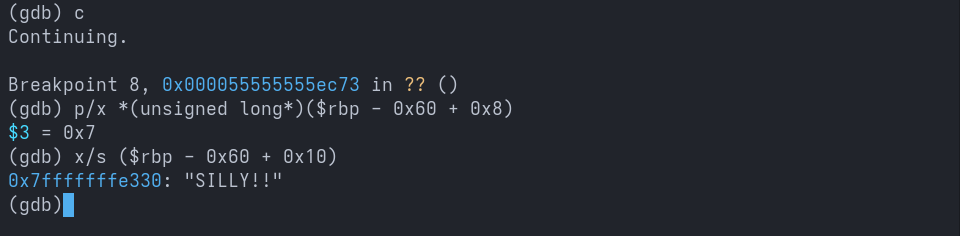
Let us confirm this using GDB. The strings we observed in Ghidra at DAT_00204630 match the values seen in the GDB dump.
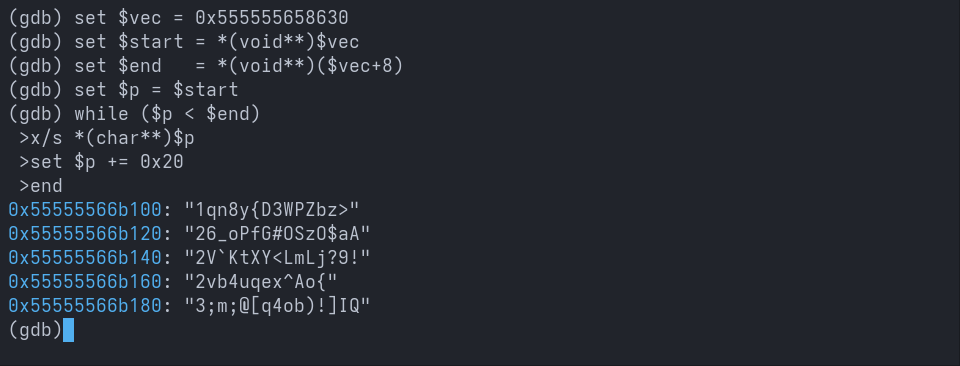
We also now know that the values propagated by FUN_00109653 are written to DAT_00204650.
Next, I tried sending the strings dumped from DAT_00204630 as responses after modifying srv.py, but it did not work as expected. There is some transformation occurring that prevents us from reaching the success path.
Let us walk through the success_checker logic and see how the values in DAT_00204630 and DAT_00204650 are transformed.
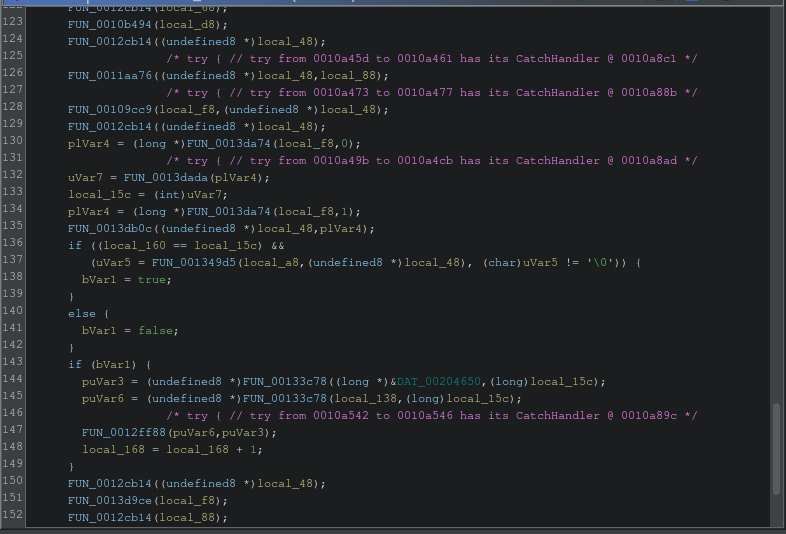
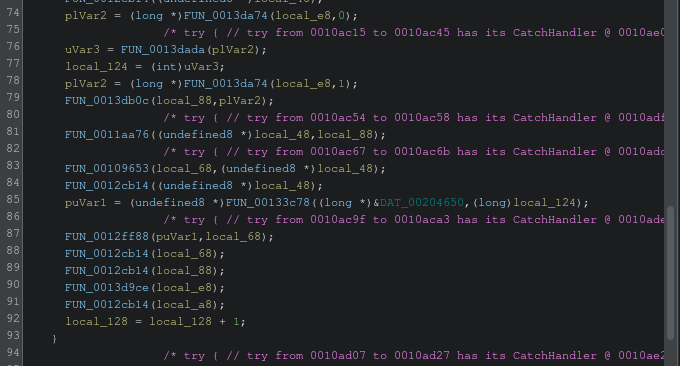
FUN_0011aa76implements assignment logic, so we rename it toassignment.FUN_00109cc9implements splitter logic that separates the index and value from the vector, so we rename it tosplitter.FUN_0012cb14implements cleanup logic, so we rename it tocleanup.FUN_0013dadaextracts the index, so we rename it toindex_extractor.FUN_0013db0cextracts the value, so we rename it tovalue_extractor.
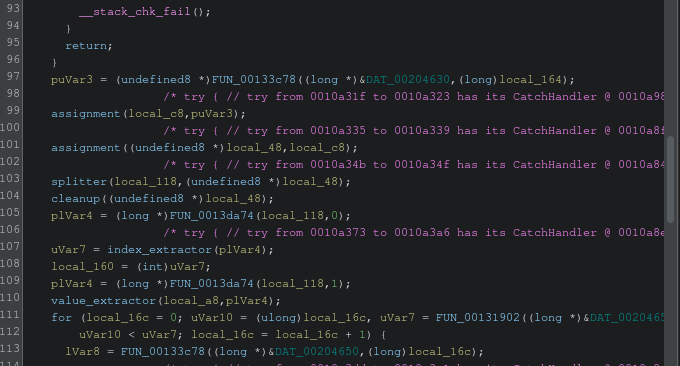
We can see that the transformation applied to DAT_00204650 is similar, but it goes through additional preprocessing before undergoing the same transformation as the values in DAT_00204630.
FUN_0010a1b0 calls ___1 from the lib.so file and obfuscates the provided value, so let us rename it to obfuscator.

Let us understand and rename a few more functions.
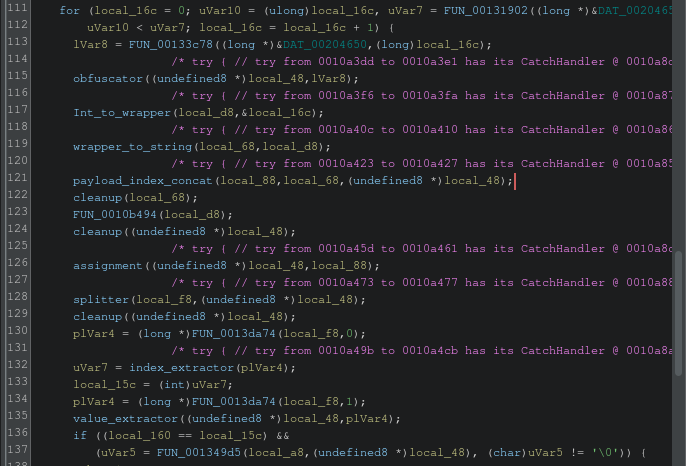
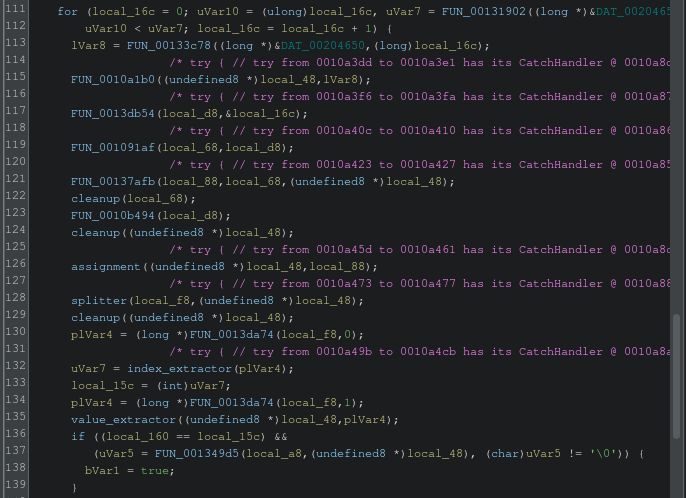
FUN_0013db54converts an integer into a typed object, so let us rename it toint_to_wrapper.FUN_001091afconverts the typed object into a string, so let us rename it towrapper_to_string.FUN_00137afbconcatenates the string index as the payload prefix, so let us rename it topayload_index_concat.
Now we have the full picture of what is going on. Time to crack SCHIZO!!
Cracking SCHIZO
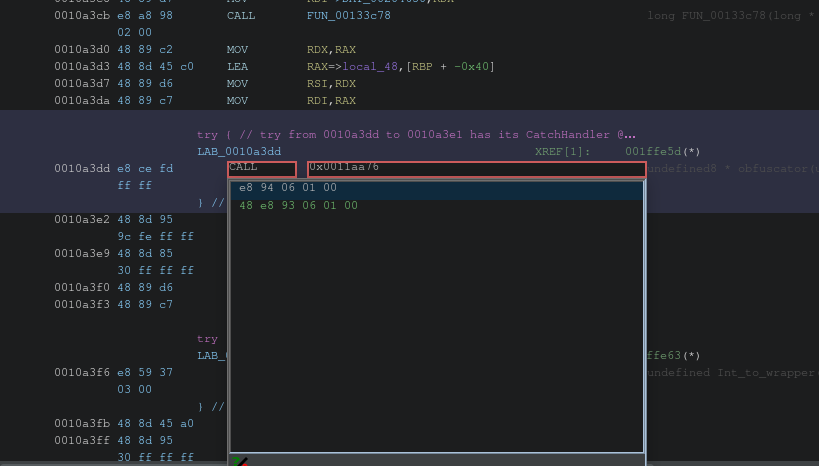
First, let us patch the instruction that calls obfuscator by replacing it with the address of assignment.
Now let us run the newly patched binary in GDB and observe the values that get concatenated to the payload after the payload_index_concat call.
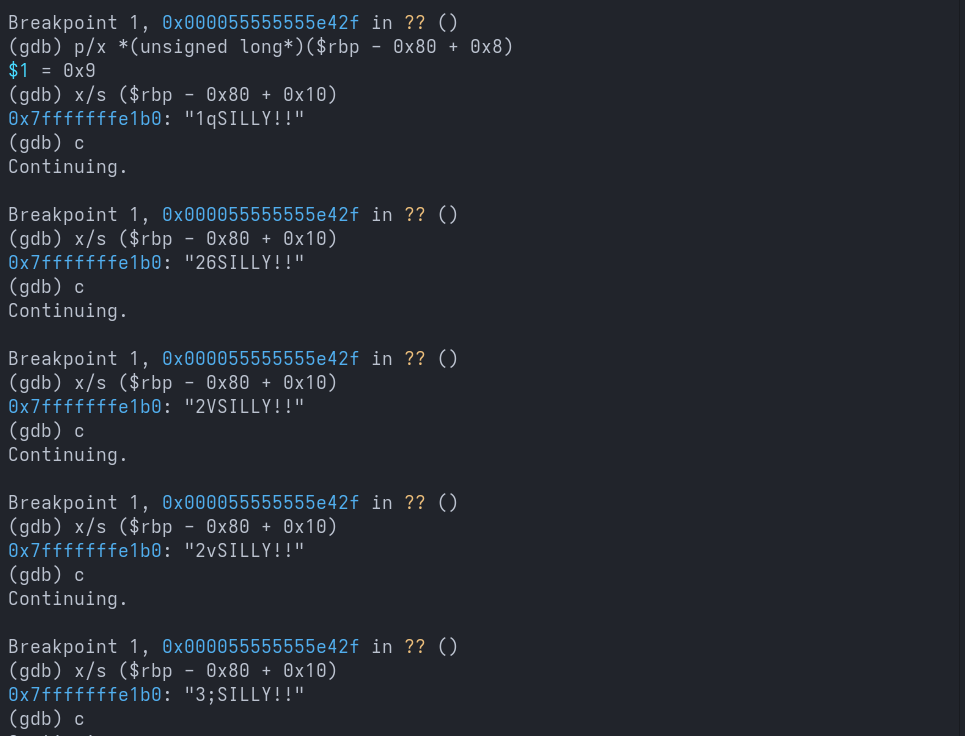
That is a clean read. Now we know which values are concatenated as prefixes, and they match the first few characters of the expected values dumped from DAT_00204630.
As the next step, we will remove these prefixes from the values, modify the srv.py file, and craft an exploit that sends the stripped payloads as responses.
The exploit code is available here.
Now let us run the schizo binary with the exploit script running in the background.
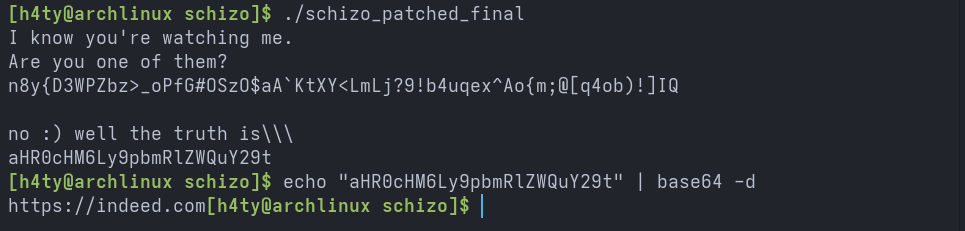
Voila, we cracked Schizo and successfully reached the hidden success path, confirming that our understanding of the validation logic, transformations, and control flow was correct.
Final Thoughts
This crackme turned out to be a well designed reverse engineering challenge that tested much more than basic static analysis. The real difficulty came from understanding subtle runtime behavior, tracking data flow across the program, and correctly interpreting how transformed values were validated.
Key takeaways from this challenge include the importance of carefully handling PIE binaries, tracking multiple base addresses when dlopen is involved, and not blindly trusting decompiler output without validating it against runtime behavior in GDB.
Overall, Schizo was a rewarding exercise that tied together static analysis, dynamic debugging, patching, and protocol level reasoning. It served as a strong practical step forward in developing a disciplined reverse engineering methodology.
See you in the next one. Cheers!
If you enjoy my work or find my research useful, consider buying me a coffee ☕ Your support helps me continue writing, researching, and building.